Loss-in-weight is becoming a popular form of mass flow measurement or control as it requires few moving or wearing parts. Measure a weighbin over time and you can can get a material flow rate either emptying or filling. Although we sample the averaged weight every second you can select the measurement comparison period from 10 to 480 seconds. A short period is ideal for small bins and extended time for larger weighbins. The system can be selected to run for one weighbin cycle then stop or can be set to hold the rate display and output whilst it refills the weighbin. Totalisers and selectable PI control are also standard features.
Caution : Not suitable for short stop, go periods or unstable weighing conditions, eg. Windy outdoor environments, moving mobile weighbins or large tare weights.
How it works
Select RUN LOSS-IN-WEIGHT if not already in this application. Press side arrow after power up when RUN (application) is displayed, key in password, enter and use side arrows to select, then enter again.
For quicker commissioning first select Security Level 1 and connect the Hardlock link. Going in to the Service menu select Calibrate, not view, in order to change settings. Change Security levels and passwords last. Note that you make changes to the whole Service menu block then press Enter.
It is advisable to first set up the Displays, Digital inputs, Function keys, Loss-in-weight Settings, SP Configuration and SP values then go to Precalibrate and set up loadcell values and scales. After this you can go through the Service menu blocks to select and set other functions that you require.
Final calibration trim can be carried out on the system using Zero Trim and, if test weights are available, Span trim.
The Loss-in-Weight Service menu contains the following function blocks. Descriptions and operation of these functions are listed in the Service menu section of this manual.
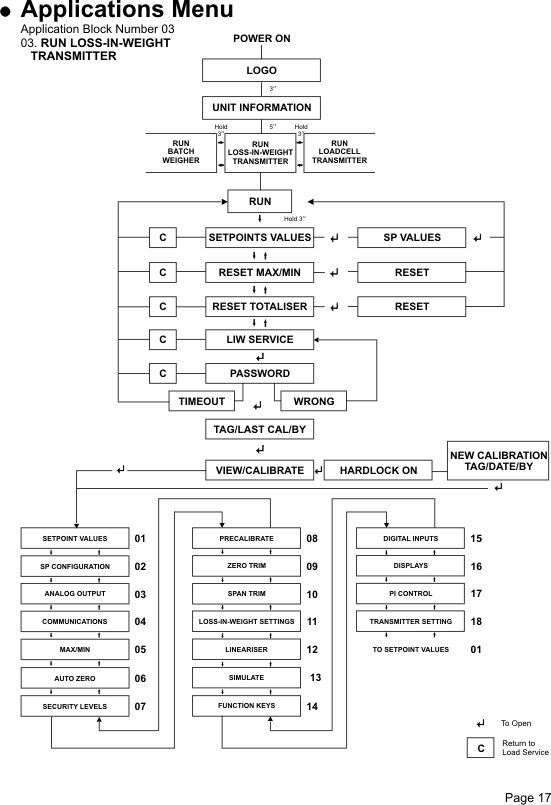
- Setpoint values Set values for setpoints 1-6
- Setpoint configuration Select functions for setpoints 1-6
- Analog output Select output 1-5V, 0-10V, 0-20mA or 4-20mA
- Communications Select and set up serial output
- Min/Max Select minimum and/or maximum hold
- Auto zero Select and set up Auto Zero Maintenance (AZM)
- Security level Select access to Operator and/or Service menu
- Precalibrate Set loadcell values, excitation, range, damping
- Zero trim Trim off empty weighbin
- Span trim Trim full scale range using test weights
- Loss-in-Weight settings Totalisers, rate, sample period, refill setpoints
- Lineariser Select up to 15 points of linearising
- Simulate For testing, force analog and relay outputs
- Function keys Set functions for keys F1-4
- Digital inputs Set functions for inputs D1-6
- Displays Set main display and up to 4 auxilliary on LCD
- PI Control Change transmitter into mass flow controller
- Transmitter settings Set password, calibration, hardware & time/date